Linux Containers Demystified: History, Internals, and Getting Started

Containers are everywhere in modern IT, and if you've been in this field for any amount of time, you've probably pulled an image or spun one up at some point. But I think a lot of people use containers without really understanding where they came from or what's happening under the hood. I want to change that with this post. Let me walk you through the history, the internals, and the basic commands you need to work with them.
Where Did Containers Come From?
The idea of isolating processes on a shared system isn't new at all. It's been evolving for over two decades.
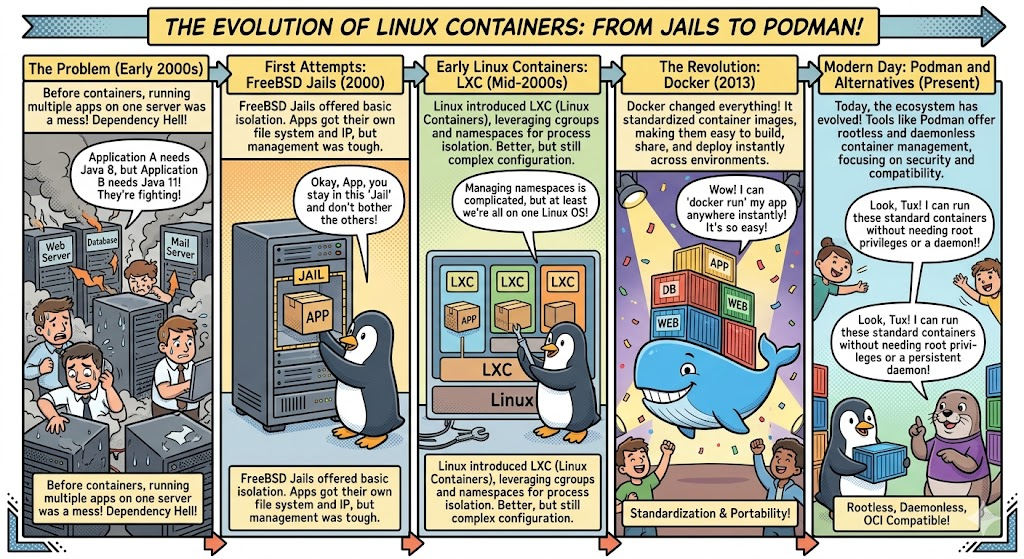
FreeBSD Jails (2000) were one of the earliest real-world implementations that I can point to. Jails let you carve up a FreeBSD system into independent mini-systems, each with its own filesystem, processes, and network stack. If you've ever worked with TrueNAS Core (formerly FreeNAS), you've seen jails in action. TrueNAS Core was built on FreeBSD and used jails as the backbone of its entire plugin system. Want to run Plex, Nextcloud, or Transmission on your NAS? Each one got installed into its own FreeBSD jail using iocage as the jail manager. Each jail was an isolated FreeBSD instance sharing the host kernel, with its own IP address and package management. You could SSH into a jail, run pkg install to add software, mount datasets from TrueNAS into the jail for storage access, and manage it all independently from the host. It was a really elegant system. TrueNAS SCALE eventually moved to Linux with Docker and Kubernetes, and as of FreeBSD 13.2 going end-of-life, jails in TrueNAS Core are now considered obsolete. But for years, jails were the go-to way to extend your NAS, and they worked great.
Solaris Zones (2004) brought similar ideas to Sun's platform, adding resource controls so you could cap CPU, memory, and I/O per zone. A lot of those resource management concepts directly influenced what Linux would build later.
Linux-VServer and OpenVZ (2001-2005) were the early Linux attempts at OS-level virtualization. Both required custom kernel patches that never made it upstream, which made them a pain to maintain. If you ever used one of those cheap $5/month VPS providers back in the day, it was probably running on OpenVZ.
cgroups and Namespaces (2006-2008) were the real game changers. Google engineers contributed cgroups (resource limits) to the mainline Linux kernel, and namespaces (process isolation) were added over time. This gave Linux native containerization building blocks without needing any patches. Everything that came after was built on top of these two features.
LXC (2008) was the first container manager that used cgroups and namespaces directly. It worked well for full system containers, but the experience wasn't very developer-friendly. Containers were still mostly a sysadmin thing at this point.
Docker (2013) is where everything changed. Docker didn't invent new kernel features. Early versions actually used LXC under the hood. What Docker got right was the developer experience: simple Dockerfiles, a central registry (Docker Hub) to share images, layered filesystems for efficiency, and a shift toward running a single app per container. That focus on developers instead of just ops teams is what drove the massive adoption we see today.
The OCI Standard (2015) was created to keep containers from being locked into any single vendor's tooling. It defined open standards for image formats and runtimes. Key projects like runc (the reference runtime), containerd (lifecycle management), and CRI-O (purpose-built for Kubernetes) all came out of this effort.
Podman (2018) as you may have seen if you ever spun up Fedora, and it came from Red Hat as a daemonless, rootless alternative to Docker. There's no background daemon running as root. Containers run as direct child processes of your user session. The CLI is Docker-compatible, so you can swap one for the other in most cases without changing anything. On RHEL and Fedora, Podman is now the default container tool.
What Do Cloud Providers Call All This?
Every major cloud provider has their own branding for container services, and it can get confusing. Here's the quick translation:
Managed Kubernetes: AWS calls it EKS, GCP calls it GKE, Azure calls it AKS.
Managed Container Runtime (no Kubernetes required): AWS has ECS with Fargate, GCP has Cloud Run, Azure has Container Instances and Container Apps.
Container Registries: AWS has ECR, GCP has Artifact Registry, Azure has ACR.
Under all the branding, it's the same technology. An OCI-compliant image you build on your local machine will run on any of these platforms without modification. That portability is the whole point.
How Containers Actually Work
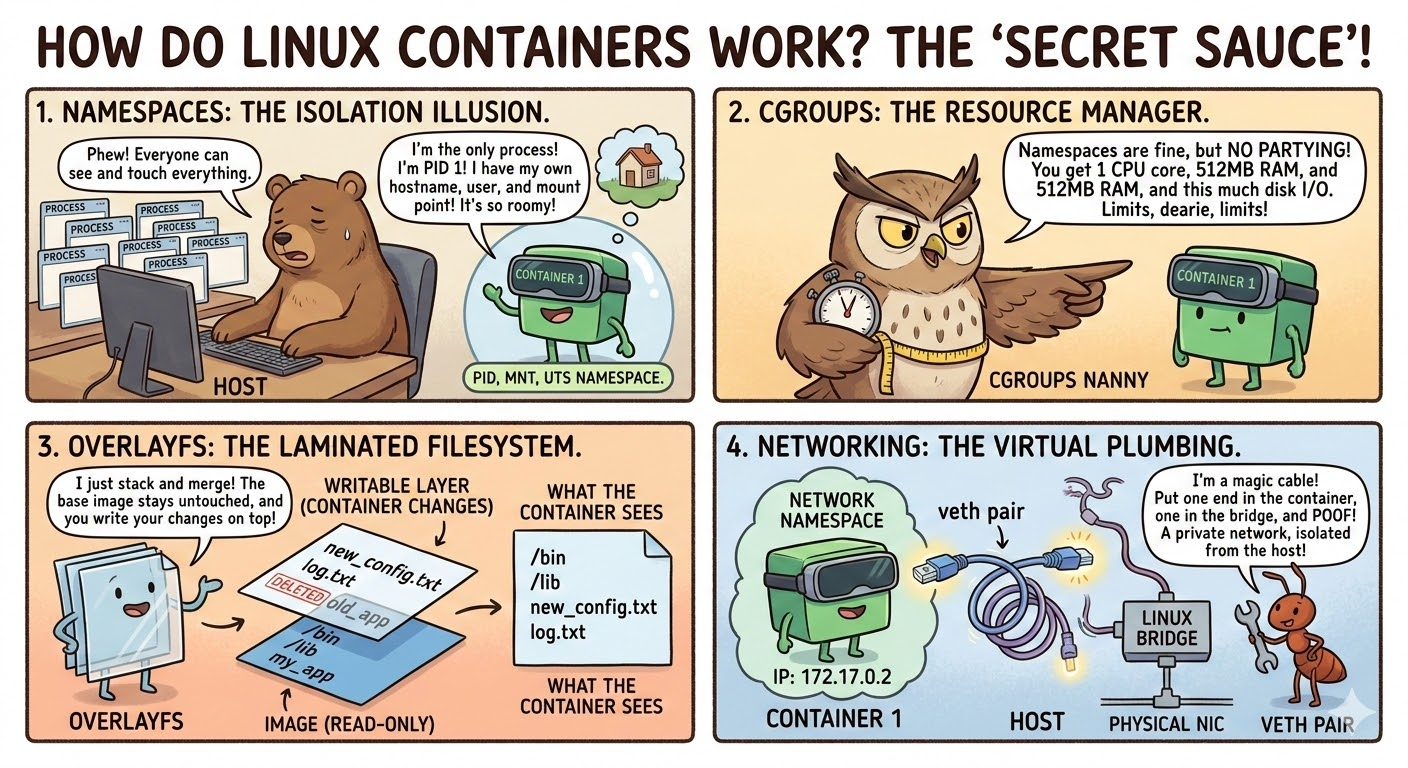
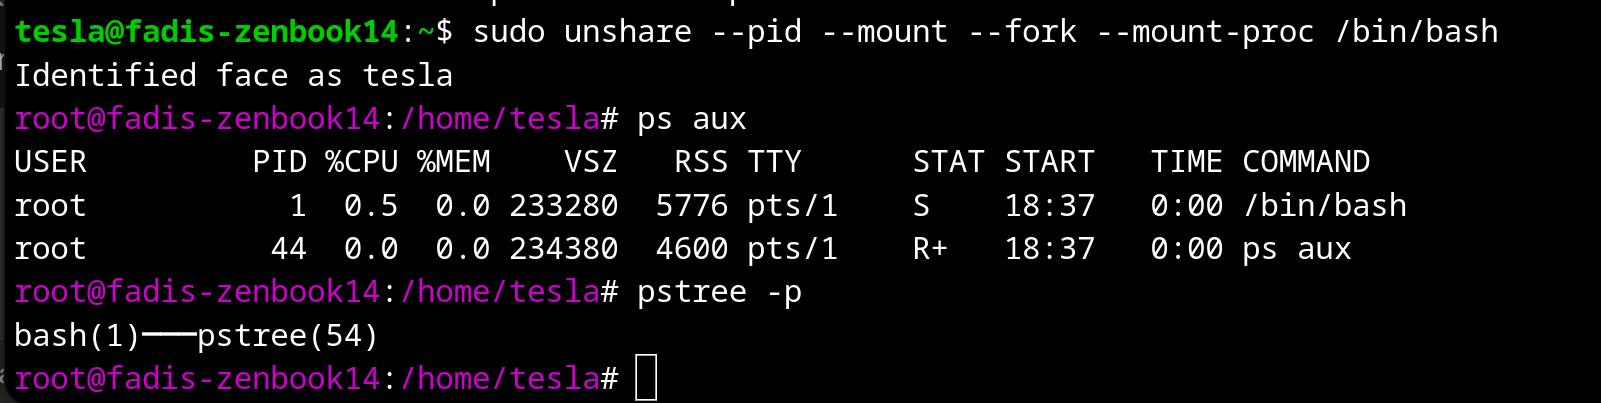
This is the part I think is most important to understand. A container is not a virtual machine. There's no separate kernel, no hypervisor, no hardware emulation. A container is just a regular Linux process that has been isolated using kernel features so it thinks it's running on its own system. Three core pieces make this work.
Namespaces: What Can This Process See?
Namespaces control visibility. Each type isolates a different part of the system:
- PID isolates process IDs. The container sees its own PID 1 and has no idea about host processes.
- NET gives the container its own network interfaces, IP addresses, and routing tables.
- MNT gives it its own filesystem view.
- UTS lets it have its own hostname.
- IPC isolates shared memory and message queues.
- USER allows a process to be root inside the container but unprivileged on the host.
cgroups: How Much Can This Process Use?
Namespaces handle what a process can see, and cgroups handle how much it can consume. They let you cap CPU, memory, disk I/O, and even how many processes a container can fork. Without cgroups, one runaway container could eat all your host memory and take everything down. With cgroups, the kernel enforces hard limits.
I like to think of it this way: namespaces say "you can only see your own stuff" and cgroups say "you can only use this much."
Union Filesystem: Layered Images
Container images are built in layers using OverlayFS. Each instruction in a Dockerfile creates a new read-only layer. When you run a container, a thin writable layer gets added on top. Any changes the container makes go into that writable layer, and the original image layers are never touched. This is why ten containers sharing the same base image are so efficient. They all reference the same read-only layers underneath, and only their individual writable layers are unique.
Networking
Containers communicate through veth pairs (virtual ethernet pipes between namespaces), a bridge network on the host that acts like a virtual switch, and iptables/nftables rules for NAT and port mapping. When you run something like -p 8080:80, the runtime creates the veth pair, connects it to the bridge, and adds a NAT rule so traffic hitting host port 8080 gets forwarded to the container on port 80.
Essential Container Commands
These commands work with both Docker and Podman. Just swap the command name if you're using one or the other.
Images
docker pull nginx:latest          # Pull an image
docker images                     # List local images
docker build -t myapp:1.0 .       # Build from a Dockerfile
docker rmi nginx:latest           # Remove an image
docker image prune -a             # Remove all unused images
Running Containers
docker run -d --name web -p 8080:80 nginx                  # Detached with port mapping
docker run -d --name app --memory=512m --cpus=1.5 myapp:1.0 # With resource limits
docker run -d --name db -e POSTGRES_PASSWORD=secret \
  -v /host/data:/var/lib/postgresql/data postgres:16         # Env var + volume
docker run -it ubuntu:22.04 /bin/bash                        # Interactive shell
Managing Containers
docker ps                   # List running containers
docker ps -a                # List all including stopped
docker stop web             # Stop a container
docker start web            # Start a stopped container
docker rm web               # Remove a stopped container
docker rm -f web            # Force remove a running container
docker container prune      # Remove all stopped containers
Inspecting and Debugging
docker logs -f web             # Follow logs in real-time
docker exec -it web /bin/bash  # Shell into a running container
docker inspect web             # Full container details
docker stats                   # Real-time resource usage
Networking and Volumes
docker network create mynet                      # Create a network
docker run -d --name app --network mynet myapp    # Run on that network
docker volume create mydata                       # Create a named volume
docker run -d -v mydata:/data myapp               # Mount a volume
Cleanup
docker system prune -a --volumes   # Remove everything unused
docker system df                   # Check disk usage
Wrapping Up
Containers are just namespaced, cgroup-limited processes with a layered filesystem. No magic, no hidden VMs. Once you internalize that, everything on top of it, whether that's Docker, Podman, Kubernetes, or a managed cloud service like EKS or Cloud Run, starts to make a lot more sense.
The technology has come a long way from FreeBSD Jails to the cloud-native ecosystems we have today, but the core idea has never changed: isolate processes efficiently without the weight of full virtualization. Get comfortable with these building blocks and the rest will follow.
I have started this blog by talking about networking for docker containers, feel free to also read more about it if you think this topic is of an interest to you.

Happy containerizing.